In search of the most optimized image in Drupal 7
I have been on a performance kick lately, trying to optimize the delivery of caching and delivery of pages to users from Drupal. It seems like the biggest piece of every site I work on are the images. While Drupal Image styles allow us to create the exact size we want, I was looking for a way to better optimize the image size, make progressive jpegs, and keep the rendered images looking as close to the original as possible.
My go-to tools for performance testing the output of any site are:
Each of these tools will analyze the URL you input, and give you actionable items that you can take to optimize. WebPagetest.org provides us the most detailed information about images and how they effect the page load.
I have been doing a lot of research about optimizing content delivery lately. My reading about optimizing images led me to this incredibly detailed article on Smashing Magazine, Efficient Image Resizing With ImageMagick by Dave Newton. The author describes in great detail how to optimize images for the web using ImageMagick, some thing I immediately had to dig into, after I re-read Mr. Newton's article a few times.
Drupal ships using the GD Toolkit that is almost always enabled in PHP. To use ImageMagick, we are going to need to ensure that
- ImageMagick is installed on our dev, staging, and production environments.
- We install, enable and patch the Drupal ImageMagick module.
Installing ImageMagick for Drupal
/* Installing ImageMagick on Ubuntu */
sudo apt-get install imagemagick

/* Installing ImageMagick on Mac OS using Homebrew */
/* If you develop locally on a Mac */
brew install imagemagick

/* Confirm the installation and install location */
/* You will need this path to enter into Drupal */
which convert

/* Install the Drupal module */
drush dl -y imagemagick
drush en -y imagemagick imagemagick_advanced
Configuring ImageMagick for Drupal
Now that you have ImageMagick, and the Drupal module installed you can configure. In the configuration section of the admin:
- Configuration > Media > Image Toolkit
- /admin/config/media/image-toolkit
We now have the ability to select the ImageMagick toolkit instead of the default GD toolkit. After you select ImageMagick, you need to enter the "Path to the 'convert' binary" which we figured out earlier when we typed "which convert". Usually this is:
- /usr/local/bin/convert (Mac)
- /usr/bin/convert (Ubuntu)
- C:\Program Files\ImageMagick-6.3.4-Q16\convert.exe (Windows)
The default configs we want to set, going back to the optimized settings that Dave Newton laid out in the Smashing Magazine article, are:
- Image quality - 82%
- Change image resolution to 72 dpi - Yes
- Convert colorspace - sRGB
- Color profile path - Leave blank to use the sRGB colorspace defined above.
Optimizing the Image styles
Thanks to the ImageMagick Advanced module, we also get an additional setting that we can set on the individual Image styles called "Strip Metadata". This will remove all of the image's metadata helping reduce size immensely according to the guys on Talking Drupal Episode #107.
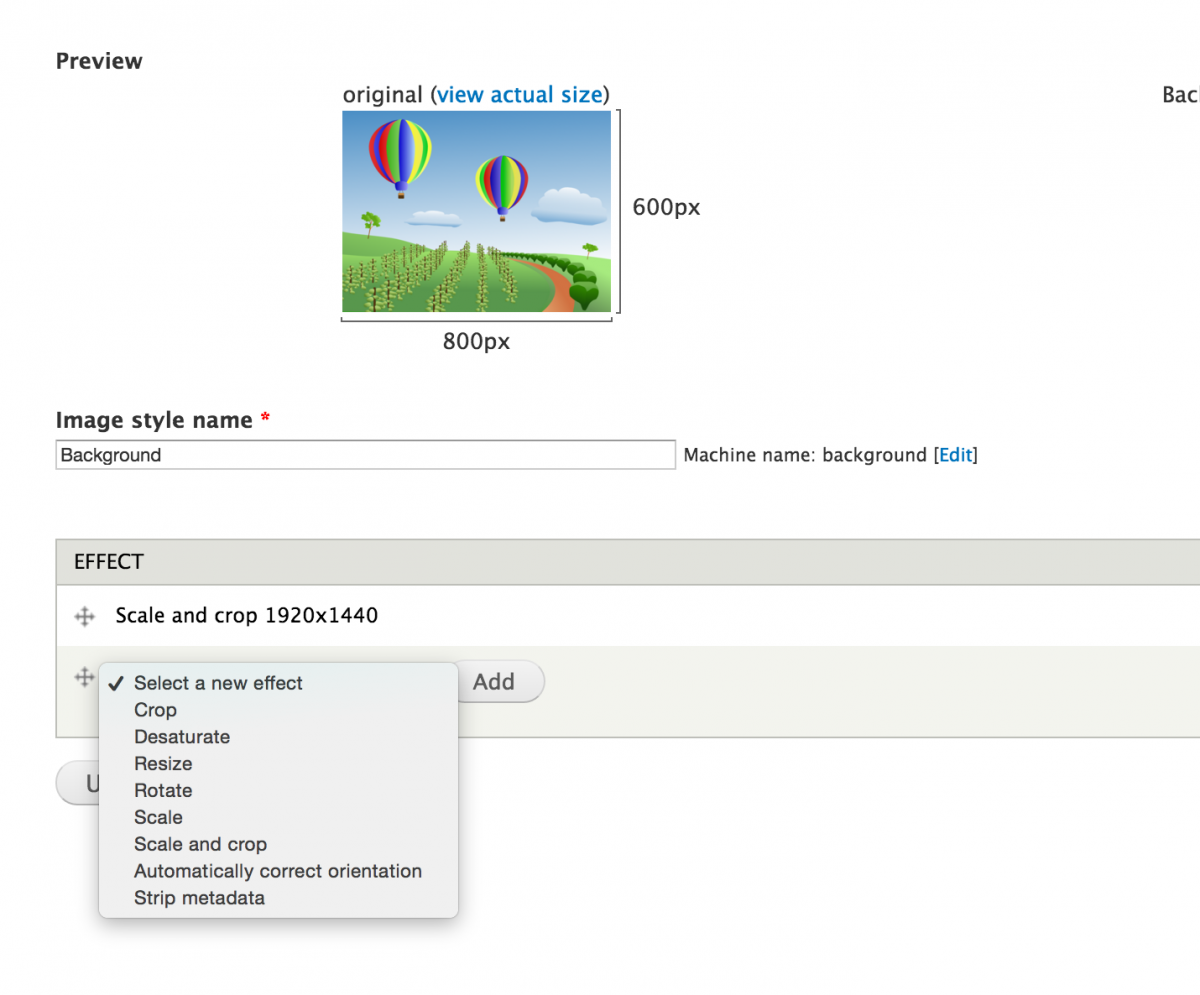
Patching ImageMagick Advanced Drupal module for additional features
There are two patches available that give us more ImageMagick functionality, and more control over our images.
-
Option for progressive jpeg - This issue, and patch gives us the option in the ImageMagick configuration to set the "Interlacing method" to Line, or Plane which will create interlaced GIFs or progressive JPEG images.
-
Additional image styles with ImageMagick Advanced - This issue, and patch gives us additional options in Image styles. The main addition to pay attention to here is the "Sharpen" preset, but you can also apply blur, drop shadow, and perspective transform if you so desire.
I prefer to download patches to /sites/all/patches/ and apply them from there. This gives the development team a consistent place to look to see if patches are applied. Download both patches and then CD into the ImageMagick folder:
/* Navigate to the module folder */
cd sites/all/modules/contrib/imagemagick/

/* Apply the patches */
patch -p1 < ../../../patches/option_for_progressive_jpeg-1883192-4.patch
patch -p1 < ../../../patches/additional_image_styles-1810390-5.patch
You will now get the ability to set the "Interlacing method" in ImageMagick configurations, and have an additional Image style option of "Sharpen" to apply.
The Results
Commit, deploy and configure these changes on your production server and run your speed tests again. You should see a vast improvement in image size thanks to the Image quality, Strip Metadata, Image resolution and colorspace. Progressive images may increase your size slightly, but your users will perceived a speed increase increase as the images will start to render immediately, instead of waiting to completely loading to render. Sharpen will help keep the quality of the original image in the smaller format.
Compare
Photoshop - 423KB:

Smashing Magazine Article ImageMagick settings - 236KB:

Drupal ImageMagick settings - 269KB:
While the Smashing Magazine article settings are by far the lowest at 236KB from the original 1.9MB file, the settings that I was able to configure using the ImageMagick Drupal module and provided patches are only only about 10% larger at 269KB.
Compare this with the Photoshop "Save for web" settings at 60% and progressive which comes out at 423KB and you now have some considerable savings, in a progressive file, that looks just as good as the original image in a web browser.
What are your favorite ways to optimize images in Drupal 7?